How to edit a video from start to finish
in Adobe Premiere Pro

Getting started
Sharing videos
Start your project.

Create a project folder.
Save project assets in one folder and avoid moving or renaming them to keep your project running smoothly.

Make a new project file.
Launch Premiere and click the New Project button at top left.

Set the project’s name & location.
In the General tab of the Project Settings window, name your project and set its location to your dedicated project folder from above.

Route your scratch disks.
Scratch what? Scratch disks are folders of files that Premiere will create behind the scenes to make your project work.
Set destinations. In the Scratch Disks tab, set all of the dropdown menus to Same as Project to keep things tidy.
Tour the interface.
View larger →

Import and sort assets.
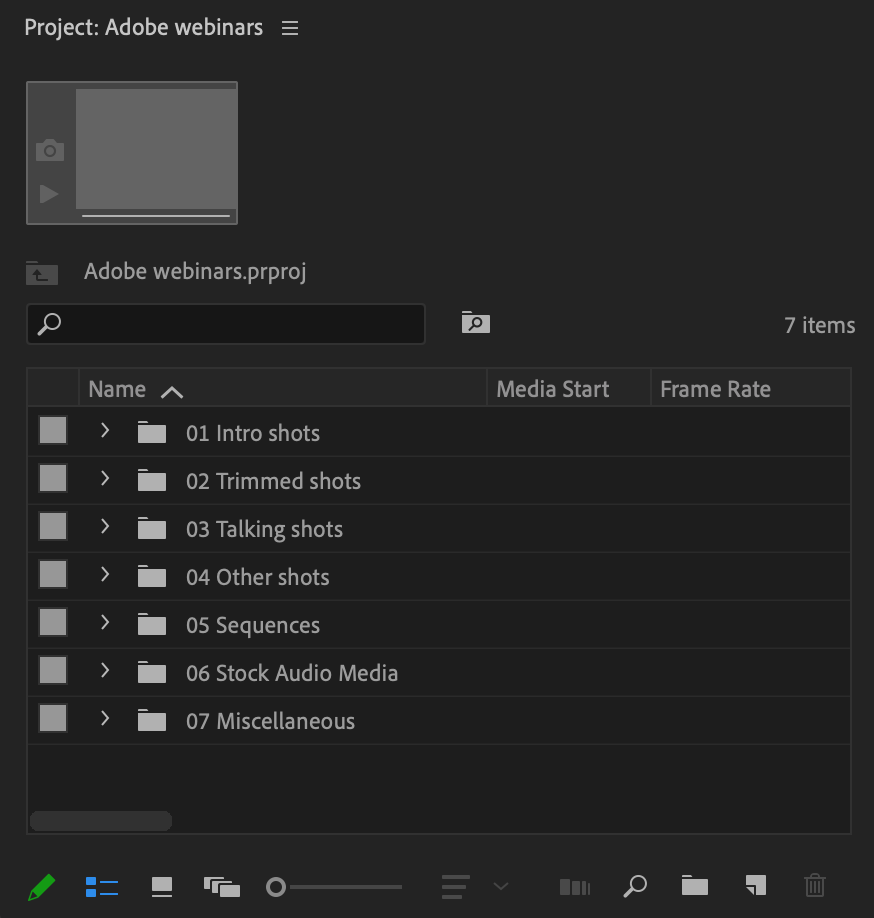
Go to the Project panel. If you don’t see it, make sure it’s checked in the Window menu.
Import assets. Right-click → Import or drag and drop from Finder/Explorer.
Create bins (folders). Right-click → New Bin or Cmd/Ctrl + B.
Find assets. Type a name or attribute (video, mp3) in the search bar at top left.
Sort assets. Organize files using the metadata columns at right or the sort options at bottom.
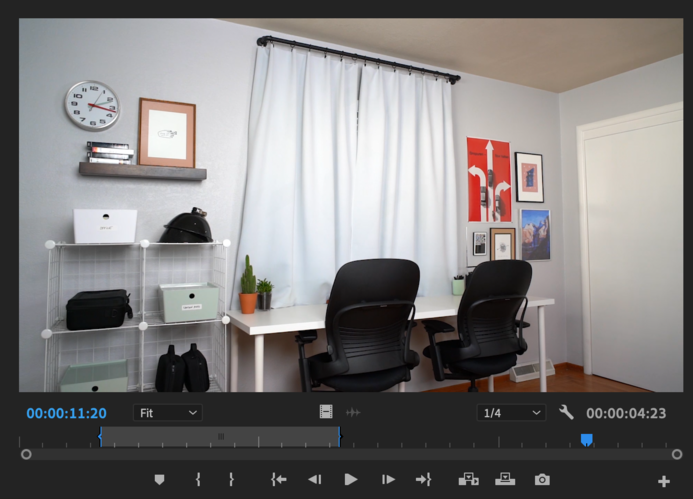
Preview and trim clips.

Trim in the project panel.
Open a bin. Double-click a bin to open it in a new tab.
Change the view. Use the view options at bottom left to switch from list view to icon or freeform view.
Preview + trim. Hover left/right to preview footage and trim excerpts by pressing the I/O keys to set in/out points (start/end points).
Add to timeline. Drag clips to the timeline or press the comma key to insert them.
Trim in the source panel.
Open assets. Double-click footage in the Project panel to play it bigger with audio in the Source panel.
Preview assets. Press the play button or space bar to play/pause footage, or use my custom keyboard shortcut FF to fast-forward.
Add to timeline. Drag from the video preview in the Source panel or press the comma key.
Add only video or audio. Drag from the video or audio icon beneath the preview screen.

Edit on the timeline.
Navigate
Play/pause space
Fast-forward (custom) FF
Previous/next clip ↑/↓
Back/forward a frame ←/→
Zoom in/out (custom) T/R
Edit
Selection tool V
Ripple edit tool B
Razor/cut tool C
Hand tool H
Pen tool P
Shortcuts
Get a list of essential Premiere Pro hotkeys.

See your sequence.

View your video in the program panel.
Watch your sequence. When you play the timeline, a preview shows here.
Zoom in or out. Use the view options at the bottom left.
Change resolution. Lower the playback resolution at the bottom right for faster performance.
Move, scale and rotate footage.

Transform a clip.
Double-click a clip in the Program panel and a frame will appear, allowing you to transform it.
Add titles and graphics.

Create your own.
Open the Essential Graphics panel. Go to the Window menu and check Essential Graphics.
Create a title. Click and type in the Program panel with the Type tool.
Create a shape. Click and drag in the Program panel with the Pen, Rectangle or Ellipse tools.
Edit titles & graphics. Click a text or shape layer in the list at the top of Essential Graphics to edit its settings below.
Stack titles & graphics. Move text and shape layers up and down in the list at the top of Essential Graphics to control what’s on top.
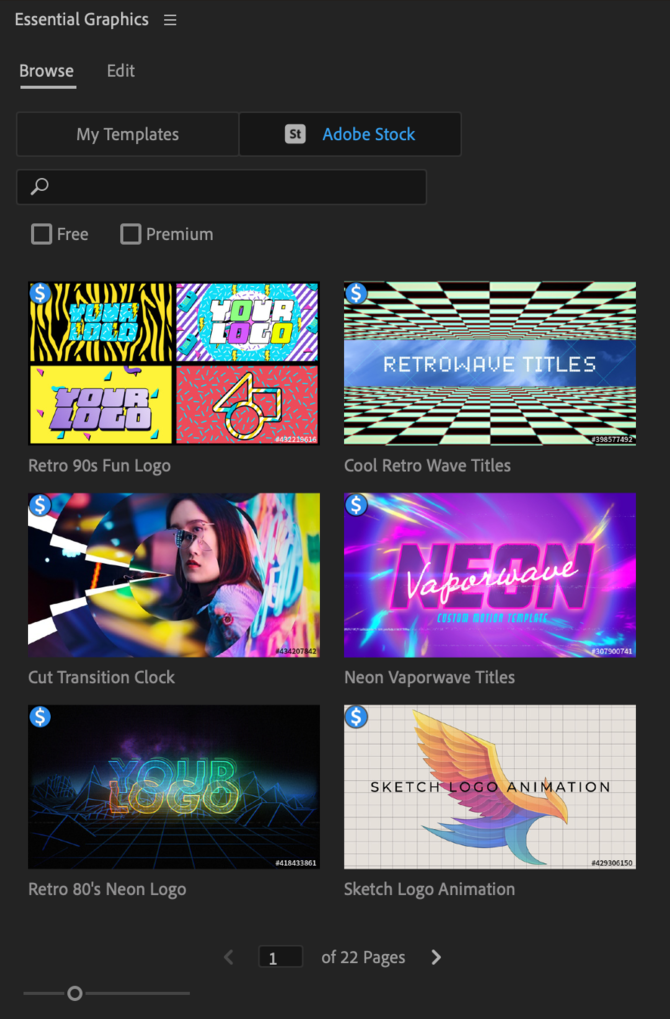
Add a template.
Browse in Premiere.
Browse motion graphic templates (a.k.a. mogrts) by going to Essential Graphics → Browse tab → Adobe Stock.
Check the free box if you’re on a budget.
Preview online.
To see moving previews, browse mogrts on Adobe Stock’s site.
Filter by Standard Content to only show free templates.
Drag to timeline.
Drag a template from the Browse tab of Essential Graphics to the timeline.

Edit a template.
Click the mogrt clip. Select the mogrt clip on your timeline to edit it in the Edit tab of Essential Graphics.
Edit settings. Change the text and other settings. (These will vary for each mogrt.)
Add media. If your mogrt allows media replacement, then drag an image or video to the placeholder in the settings.
Render a template. Select your mogrt clip and go to the Sequence menu → Render Selection to play it back without lag.
Apply effects.

Browse & add effects.
Open the Effects panel. Go to the Window menu and check Effects.
Find effects. Use the search bar or expand the bins below.
Add effects. Click and drag effects to clips on the timeline.
Use popular effects.
Crop
Flip horizontal/vertical
Ultra key (for green screens)
Cross Dissolve (video fade transition)
Constant Power (audio fade transition)
Auto reframe (fits new size)
Warp stabilizer (for shaky footage)

Control effect settings.
Open the Effect Controls panel. Go to the Window menu and check Effect Controls.
Adjust effect settings. Expand an effect to edit its settings.
Render effects. Select the clip and go to the Sequence menu → Render Selection to play it back without lag.
Adjust color.

Make basic corrections.
Open the Lumetri Color panel. Go to the Window menu and check Lumetri Color.
Select a clip. Click a clip on your timeline to adjust its color in Lumetri Color.
Adjust settings. Expand the Basic Correction section to edit familiar controls.

Add creative looks.
Browse filters. Expand the Creative section and preview looks by clicking left/right.
Add a look to a clip. Double-click the look preview to add it to your clip and then adjust its intensity below if you want.
Save a color preset. Click the hamburger menu at top left, select Save Preset and name your preset.
Apply a color preset. Search for your preset in the Effects panel and drag it to all of your clips if you want.
Edit speaking audio.

Assign dialogue clips.
Open the Essential Sound panel. Go to the Window menu and check Essential Sound.
Assign clips as dialogue. Select the speaking clips on your timeline and click Dialogue in the Edit tab of Essential Sound to see related settings.
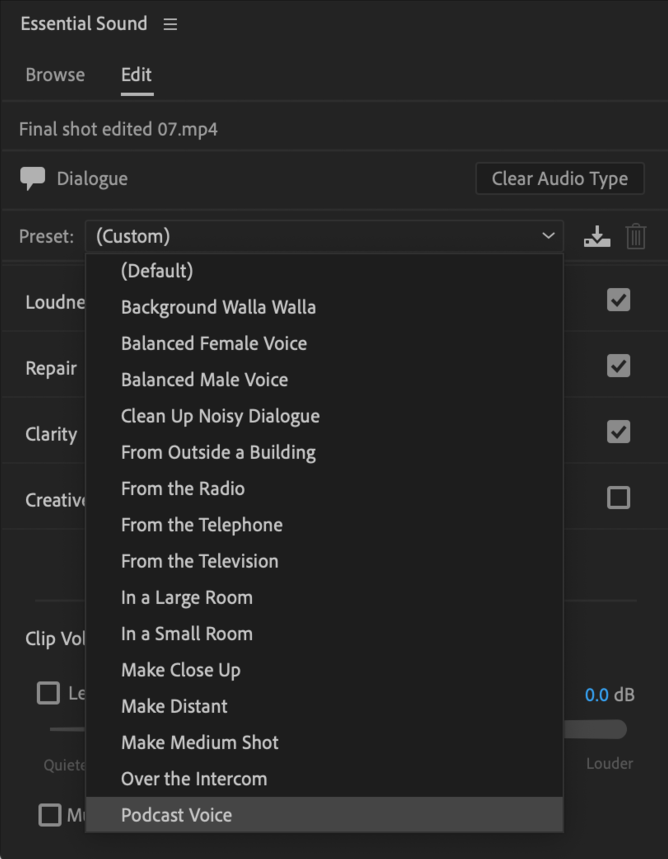
Select an audio preset.
Click the Preset dropdown menu near the top of the Essential Sound panel (Podcast Voice is always a good bet), and Premiere will automatically add appropriate settings.

Edit audio manually.
Match loudness. Expand the Loudness section and click the Auto-Match button.
Clean up audio. Expand the Repair section to remove background noises.
Adjust volume. Use the level slider and mute check box at bottom.
Add & balance music.

Find music.
Open the Essential Sound panel. Go to the Window menu, check Essential Sound and click the Browse tab to search Adobe Stock’s music collection. (Get 10 free songs with a trial.)
Search for songs. Find tracks by keyword or filters.
Preview music. Play music with your timeline by checking the timeline sync box at bottom left and moving your playhead where you’d like the song to start.
Add to timeline. Drag a song to your timeline to edit it and make sure it works.
License songs. When you’re ready, right-click a music track from Adobe Stock and pick License.

Balance music.
Assign music clips. Select the music tracks on your timeline and click Music in the Edit tab of Essential Sound.
Enable ducking. Check the Ducking section, click the Speech bubble to lower (or “duck”) music under speaking clips that you’ve assigned as dialogue.
Apply ducking. Click the Generate Keyframes button below.
Resize your video.

Auto-reframe your video.
Find your sequence. Locate your sequence in the Project panel by typing “sequence” in the search bar at the top. (This was automatically created when you added a clip to the timeline.)
Auto reframe. Right-click → Auto Reframe Sequence.
Pick a size. Choose a Target Aspect Ratio (square, vertical, horizontal), and rename your sequence if you’d like.
Set motion tracking. Tell Premiere whether the motion in your clips is fast or slow. This will help it track any moving subjects to keep them within the frame.

Adjust results if needed.
Find settings. Select a clip on your timeline, go to the Effect Controls panel (Window → Effect Controls) and expand Auto Reframe.
Change what’s in frame. Move a video within the frame by adjusting the position values beside Reframe Offset.
Export your video.

Export a single video.
Choose a sequence to export. Whichever sequence is open on top in the Timeline panel will be exported.
Open export settings. Go to File → Export → Media or use the shortcut Cmd/Ctrl + M.
Decide what to export. Choose how much of your timeline you want to export at the bottom left of the Export Settings window.
Choose a file format. Pick H.264 at top right if you want to upload your export online.
Pick a preset. Choose Match Source - High bitrate at top right to match the video to your sequence size and pack in lots of bits of data.
Click Export. This button at bottom right will start your export. (It could take several minutes.)

Export multiple videos.
Click Queue. Follow the steps above for exporting a single video, but instead of clicking Export at the bottom right of the Export Settings window, click Queue.
View the Queue. Notice that another Adobe app called Media Encoder has automatically launched and added your export job to its Queue panel.
Queue more export jobs. Add more export jobs from Premiere to Media Encoder by repeating earlier steps.
Start exporting the queue. Go to the Media Encoder app and click the play button at top right to start exporting the queue.

Keep learning.
Get step-by-step lessons on everything here along with motion graphics, transitions, workflow tips (plus tons of resources and support) in The Big Video Course.